Custom Fields Menu
This menu allows you to customize the available fields for all your content (Settings, Entries/Branches, Campaigns, Arcs, Sessions, and Fronts), and fine-tune your AI generation settings for specific fields and image generation [Advanced Feature].
INFO
No changes are saved in this dialog (including sub-dialogs) until you hit "Save".
INFO
All of the AI features in this dialog will only appear if you have configured a server in the Advanced Settings menu.
Content Type Selection
At the top of the window, you can select which content type you want to configure custom fields for. Note that Characters, Locations, Organizations, and PCs can each have a separate set of custom fields.
Each content type maintains its own separate set of custom fields.
Fields Tab
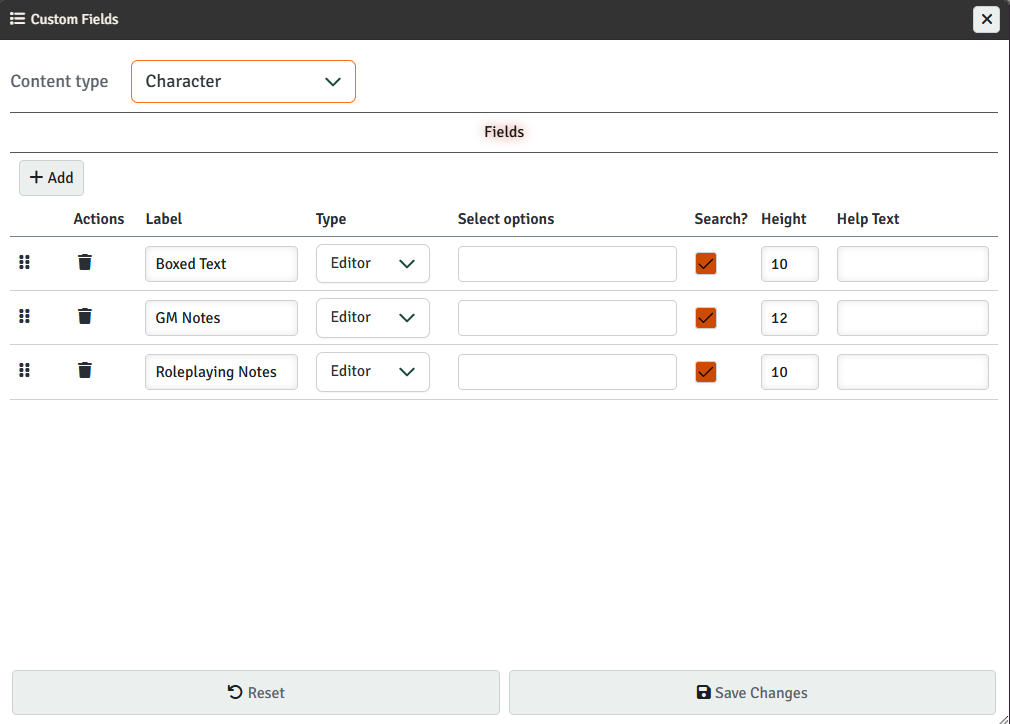
The Fields tab allows you to add and manage custom fields for the selected content type.
Adding Fields
Click the Add button to create a new custom field. Each field has the following properties:
- Label - Label is the text shown next to the input for the field. The initial label also determines the "name" of the field that is used to store the data internally (and to specify it in AI templates (see below) [Advanced Feature]). Once a field is saved, that name will never change, even if you change the label in the future. This ensures that the field will also display any data you've previously created for it. So, if you want to replace one field with another, you're better off deleting the old one and creating a new one, or the old data will continue to show.
- Type - The field type:
- Input - Single line text input.
- Select - Dropdown selection
- Editor - Text editor with formatting options
- Checkbox - Yes/No checkbox
- Select Options - Only visible for Select fields, this is where you configure the options that will appear in the dropdown menu. Separate options with semi-colons.
- Search - Should the text in this field be indexed for search results?
- Height - For Editor fields, you can configure how tall the box is (in rows, more or less).
- Help Text - The help text (if any) that shows up when you hover over an "i" icon next to the field.
Managing Fields
- Reorder - Drag the handle on the left to change field order
- AI Template - For Editor fields, click the brain icon to configure whether and how the field can be AI-generated [Advanced Feature]
- Delete - Remove a field with the trash icon
AI Configuration Dialog [Advanced Feature]
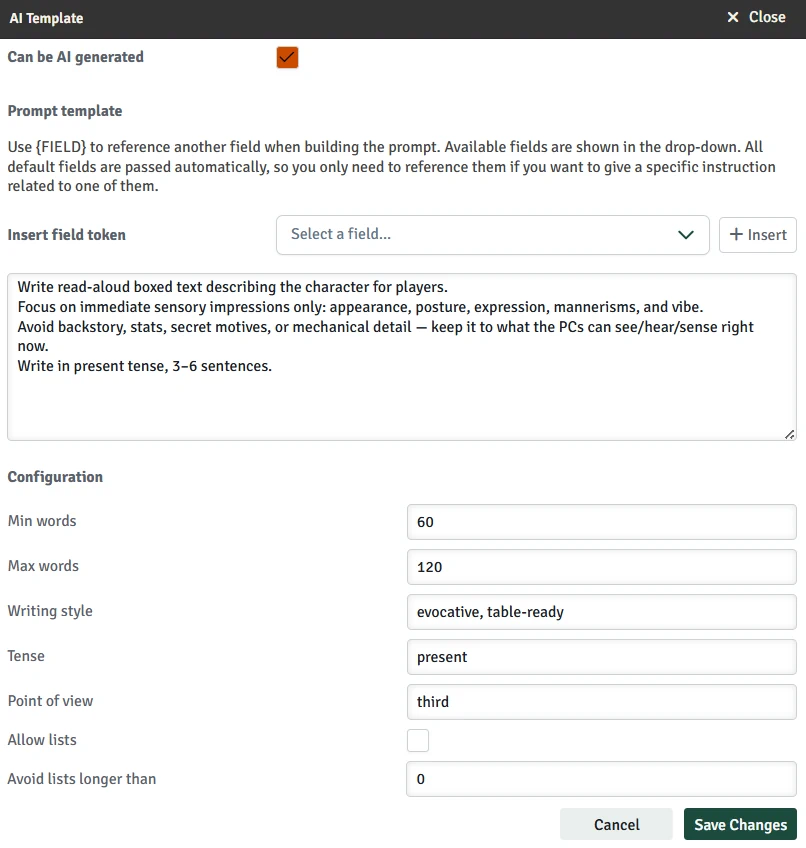
Clicking the AI icon next to any Editor field opens the AI Configuration Dialog. This dialog allows you to configure whether and how that specific field can be automatically generated using AI.
Enable AI Generation
- Can be AI generated - Toggle this checkbox to enable or disable AI generation for this field. When disabled, the field will not have an AI generate option in the main Campaign Builder interface.
Field Tokens
All default fields (name, description, parent, species, etc.) are passed to the AI automatically. So you only need to reference them when you want to provide specific instructions related to a field. If you want the AI model to know anything from one of your custom fields, you need to reference it here.
TIP
Fields are generated by the AI individually (though you can run more than one at once). This means that if Field A references Field B, you need to generate Field B (and wait for it to finish) before generating Field A (or the model will think Field B is blank).
Prompt Template
The prompt template tells the AI how to generate content for this field. You can write detailed instructions here and include field tokens to make the generation contextual.
Field Tokens
Field tokens allow you to reference any field in your prompt using the format {fieldName}. This lets you create contextual prompts that use information from other parts of your content.
You can type them directly in the prompt or select them with the dropdown (which shows everything available) and use the button to insert them into the text box.
Example Prompts
For a field to hold "boxed text" for an NPC like you'd find in a published module:
Write read-aloud boxed text describing the character for players. Focus on immediate sensory impressions only: appearance, posture, expression, mannerisms, and vibe. Avoid backstory, stats, secret motives, or mechanical detail — keep it to what the PCs can see/hear/sense right now.
Note that we didn't include any details about the NPC, so the model will rely on the name, species, and description fields (which it gets automatically).
For a "Motivation" field based on another field you have called "Deep Secrets":
This character has the following deep secrets:
{deep_secrets}

Based on that information, infer this character's primary motivation or driving force. What underlying need or desire is most important to them? How does this motivation influence their behavior and decisions?
Configuration Options
These settings control the style and format of the generated content:
- Min words - Minimum number of words the AI should generate (approximate, may vary slightly)
- Max words - Maximum number of words the AI should generate (approximate, may vary slightly)
- Writing style - Instructions about the tone or style (e.g., "formal", "casual", "poetic", "technical")
- Tense - The grammatical tense to use (e.g., "past tense", "present tense")
- Point of view - The narrative perspective (e.g., "third person", "first person")
- Allow lists - Whether the AI can use bullet points or numbered lists
- Avoid lists longer than - If lists are allowed, limit them to this maximum number of items (approximate, may vary slightly)
Images Tab [Advanced Feature]
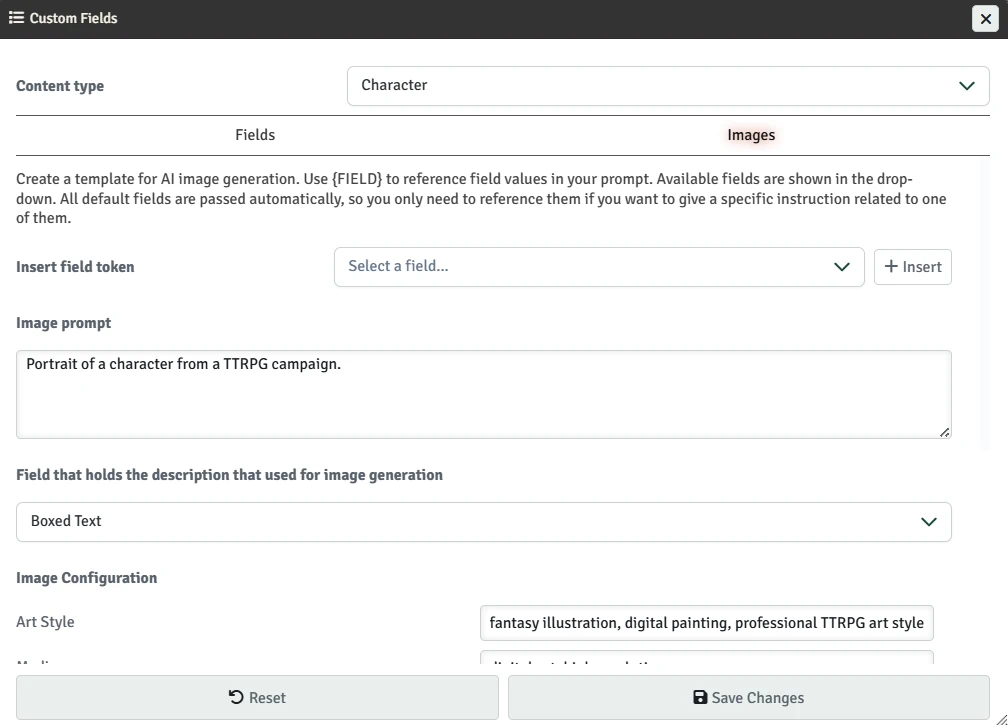
The Images tab allows you to configure AI image generation settings for your content. This tab is only visible when you have the advanced features backend configured.
Image Generation Prompt
Configure a custom prompt template that will be used when generating images for this content type. You can use field tokens to dynamically include content from your fields in the prompt.
Field Tokens
Field tokens allow you to reference any field in your prompt using the format {fieldName}. You can type them directly in the prompt or select them with the dropdown (which shows everything available) and use the button to insert them into the text box.
Example Prompt
Portrait of a character from a TTRPG campaign.
NOTE: Because so much content is sent to the model (a description field you specify and all the configuration), image prompts can often be very short unless you want to refer to additional custom fields. For example, you could create a second field that, if present, overrides the main description like so:
Portrait of a character from a TTRPG campaign. There may be a description OVERRIDE for this character. If there is, you should include every fact in this new description when generating the image, and completely ignore the main description to the extent it is contradicted by this one.
Here is the OVERRIDE description:
{secondary_description}
Description field
This lets you choose the field that is always sent to the model to be used as the description of the image. It is highly recommended that you use a field that ONLY contains descriptive content for the image and nothing else. Anything mentioned in this field is likely to be included in the generated images.
Style Settings
Configure detailed parameters for image generation. Each field accepts specific instructions to guide the AI:
- Art Style - The artistic style (e.g., "watercolor", "oil painting", "digital art")
- Medium - The artistic medium (e.g., "ink", "pencil sketch", "oil on canvas")
- Model Style - The AI model style (e.g., "cinematic", "anime", "photorealistic")
- Content Rating - Age appropriateness (e.g., "PG", "PG-13", "R")
- Composition - Framing and composition (e.g., "close-up portrait", "wide shot", "dynamic angle")
- Lighting - Lighting conditions (e.g., "golden hour", "moody rim light", "dramatic")
- Color Palette - Color scheme (e.g., "muted earth tones", "vibrant primaries", "monochromatic")
- Camera - Camera/lens type (e.g., "35mm", "telephoto", "wide-angle")
- Mood - Emotional tone (e.g., "ominous", "whimsical", "serene")
- Negative Prompt - Things to avoid in the image (e.g., "text, words, signatures")