Story Webs - Relationship Graphs
INFO
Story Webs are an optional feature and can be disabled in the Module Settings.
Story Webs provide a visual way to explore and manage relationships between entries in your Settings and Campaigns. These interactive graphs let you see connections between characters, locations, organizations, PCs, and Fronts/Dangers at a glance, making it easy to understand the complex web of relationships in your story.
Each story web is a saved graph that you can create, name, and customize to show specific relationships or aspects of your campaign. Story Webs live inside a single Campaign and are shown in the Campaign Directory under the "Story Webs" section.
Creating and Managing Story Webs
Creating a New Story Web
- Navigate to your Campaign in the Campaign Directory
- Right click the "Story Webs" folder to create a new diagram. You can use different diagrams to show different subsets of your content.
- Enter a name for your Story Web
- The Story Web opens in a new tab with the graph interface
Story Web Header
- Name - Click the Story Web's name to edit it
- Save - Changes are automatically saved as you work
Deleting a Story Web
Right-click on the Story Web in the Campaign Directory and select "Delete" to remove it permanently. This will not impact any of the content contained in the graph - it just deletes that particular visualization.
Duplicating a Story Web
Right-click on the Story Web in the Campaign Directory and select "Duplicate Web" to create an exact copy of the Story Web.
Exporting a Story Web as PNG
Right-click on the Story Web in the Campaign Directory and select "Download as PNG" to export the entire story web as a PNG image file.
Working with the Graph Interface
The Story Web interface provides an interactive canvas where you can manipulate shapes representing Entries and Dangers and the connections between them to visualize relationships.
Node positioning
- Drag nodes to arrange them however you like
- Nodes will automatically move around to try to keep your picture clean and readable. This can be disabled in the Module Settings, where turning off "Auto-arrange Story Webs" will let you (and force you to) position each node exactly where you want it.
- Dragging a node to an edge will cause the graph to pan
- Positions are automatically saved so your layout persists when you reopen the Story Web
Overall view controls
- Use the zoom in/out buttons to adjust the graph view
- Scroll to zoom (if supported by your device)
- Pan the whole graph by clicking and dragging on empty graph space
Viewing content details
- Right click an Entry or Danger and choose "open in new tab" to view the content
Deleting content and connections
- Select a node or connection line and press the Delete key
- Deleting Entries or Dangers does not impact the content in your Setting/Campaign - it just removes it from the graph.
- Deleting connections will remove the relationship between the content in your Setting/Campaign.
Adding content to the graph
You can add three types of content to your Story Web:
- Entries (Characters, Locations, Organizations, PCs)
- Individual Dangers (from Fronts)
- Custom text
Adding Entries (Characters, Locations, Organizations, PCs)
Method 1: Drag and drop
- Drag Entries from the Setting Directory directly onto the graph
- Only the dragged Entry is added
- Dropping an Entry onto an existing shape in the Web will prompt you to create a new relationship between the two (if they aren't already connected)
- Holding the Control key while dropping an Entry will add it to the graph while also bringing in all of the directly-related entries(like "Add with relations" from the context menu)
Method 2: From the directory context menu
- Right-click an Entry in the Setting Directory
- Select "Add to current graph" or "Add with relations"
- "Add with relations" brings in the entry plus all its 1st degree connections
- If any connected entries are already on the graph, those connections will be shown (and entries won't be added multiple times)
Method 3: From the graph context menu
- Right-click open space in the Story Web graph
- Select "Add Entry/Danger" or "Add Entry/Danger with relations"
- You'll get a dialog asking you to select what you want to add
- "Add with relations" brings in the entry plus all its 1st degree connections
- If any connected entries are already on the graph, those connections will be shown (and entries won't be added multiple times)
Adding Fronts and Dangers
Method 1: Drag and drop
- Drag Fronts from the Campaign Directory directly onto the graph
- All Dangers from the Front will be added to the graph
- Holding the Control key while dropping a Front will add all Dangers plus their related participants (Characters/Organizations)
Method 2: From the directory context menu
- Right-click a Front in the Campaign Directory
- Select "Add to current Story Web" to add all Dangers from the Front
- Select "Add with Relationships" to add all Dangers plus their participants
- If any connected entities are already on the graph, those connections will be shown (and entities won't be added multiple times)
Custom text
Custom text can be added to a Story Web directly to represent concepts, groups, ideas, or notes that aren't otherwise defined in your Setting/Campaign:
- Right click on an empty space in the graph and select "Add Text"
- Enter the text you want to add
Indirectly added content
When you choose to add an Entry/Danger along with its relations, the related content brought in indirectly is shown using an oval instead of a rectangle. The distinction is important because indirect content will automatically be removed if all of the directly-added content it is connected to is removed.
For example, you add "Joe Smith" with a relationship to "Sally Smith" (sibling). Joe shows up as a rectangle, Sally as an oval. You can then delete the Sally oval from the content and it simply disappears. But if you first delete Joe, Sally will also be removed (unless she was also connected to some other displayed content).
Adding Sally to the graph manually will convert the oval to a rectangle, so she will then behave as if you had directly added her to begin with.
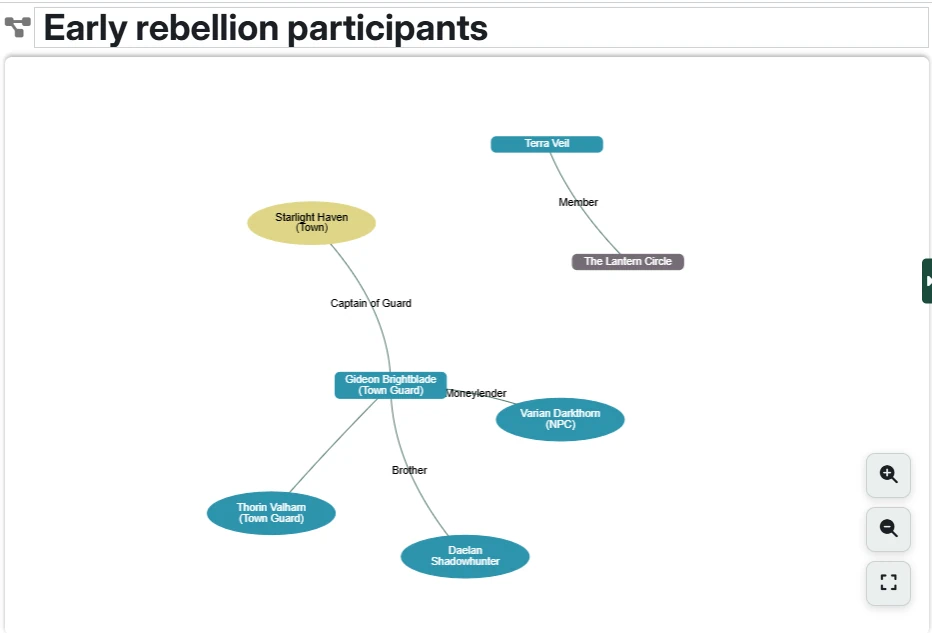
Visual Legend
Different entry types are represented by different colors and shapes:
- Content added to graph directly by you - rectangles
- Content added indirectly - ovals
By type of content:
- Characters - Blue
- Locations - Yellow
- Organizations - Gray
- PCs - Light green
- Dangers - Dark red
- Custom text - White boxes with dark green border
Working with connections
Creating relationships
Method 1: Drag and drop
- Drag one Entry node from the directory and drop it onto an Entry, Danger, or custom Text in the graph and you will be prompted to create a new relationship between them. Other than for customer text, this will also add the relationship to the Content items in your Setting/Campaign.
Method 2: "Add connection"
- Right click on any node and select "Add Connection". You will be switched to connection mode where you can move the mouse to point at any other node and click to connect them.
- Press escape to cancel the connection activity.
Connection labels
- The text on connections shows the "relationship" or "role" field from the actual relationship
- You can edit connection text directly on the graph by double-clicking the connection or right clicking and choosing "Edit Connection". Other than for custom text, these changes will also update the description of the relationship in your Setting/Campaign.
Connection styles
- You can right-click on any connection and choose to change its color and style (solid, dashed, etc.)
- You can customize what colors/styles are available and what they are named in the Story Web Configuration Menu. For example, you might choose to make red lines denote enemies, green lines denote allies, etc.
- These styles are independent of the labels, so they are convenient for denoting secondary relationships as well. For example:
- Use the relationship text to capture relationships players know about while using the line color to show the actual relationships.
- Use solid lines to show things the characters know while dashed lines show things they don't know yet.
- Use a line color to mark that two characters (Max and Sally) are enemies and then mark the relationship text as 'Max thinks they're friends".