Session Prep
Session prep is when you get ready for your next game session by pulling together your ideas for what happens next with the elements from your Setting so that you'll be ready for whatever comes up.
Campaign Builder is designed after the Lazy DM method, though it should be adaptable to whatever your style.
If you have enough screen real estate, you can use the multi-panel interface to keep the current campaign and session in tabs in one panel, while using other panels to view/edit individual Locations, Characters, etc.
Campaigns
Before prepping for a session, you first have to create the overall Campaign it fits into. You can outline a description and house rules, and connect the PCs (see below).
Core Session Prep Components
Core concepts
Campaigns
- Create your Campaign
- Attach the PCs to the campaign
- Start to capture your Ideas
- Create or update Fronts to track long-term threats and storylines for the campaign
- Use Story Webs to visualize the relationships between your characters, locations, etc. in diagrams.
Arcs and long-term planning
Sessions
- Review PCs - think through plot points to bring in to the next game
- Outline your Strong Start
- Flesh out the Vignettes ("scenes" in Lazy DM parlance) so you're ready to keep things moving
- Define Lore (what Lazy DM calls "secrets and clues") - flesh out the clues your players might discover
- Connect to the Amazing Locations in your Setting, giving you one-click access to the description, image, association to other Entries, along with links to Foundry Actors and Scenes.
- Prepare the Important NPCs the players may encounter to have easy access to descriptions, pictures, backstories, and Foundry character sheets/tokens
- Sketch out the Monsters, so you have tokens and stat sheets at your fingertips
- Prepare a list of Magic Items you might hand out to players for victory
Note on Locations, Vignettes and Scenes
- Locations are places (in Settings) that represent a country, a city, a building (or a room in building), etc. They can be tied to Foundry scenes - and more than one, in case you want to use them for different parts of the location or different times (pre/post a fire, for ex. or night vs day).
- Locations can be added to Sessions and then with a click you can get the lore you've built in the world around that location, as well as 1-click access to activate any of the related Foundry scenes.
- Vignettes are what the Lazy DM calls "scenes". The are short descriptions of a scene that could happen during a session. I renamed them to Vignettes to avoid confusion with Foundry scenes.
Fronts and long-term threats
Fronts are an optional tool for tracking larger-scale threats and story threads across many sessions. A Front is made up of one or more Dangers, each with Grim Portents and an Impending Doom.
If you like to think about how the world changes off-screen, or want to keep track of villain plans and looming disasters, Fronts give you a home for that work:
- During World Building, you create the people, places, and organizations that Fronts will later reference.
- During Session Prep, you can update Fronts so their Dangers are ready to intersect with the next session. You can mark Grim Portents complete as events unfold.
- When you Record Results, you can adjust Fronts based on what actually happened at the table.
You can safely ignore Fronts if you don’t need this level of structure, or turn them off entirely in Module Settings.
Story Webs
Story Webs are an optional tool that allows you to visualize the interconnections between the elements of your world/campaign in a diagram.
Sample Session Preparation Walkthrough
The Campaign Builder helps you prepare for your sessions using the Lazy DM method, a streamlined approach to session preparation that focuses on the essential elements needed to run an engaging game. This guide will walk you through preparing your sessions effectively. If you prefer to use a different approach to your session prep, I suspect the same structure can be used. File a feature request if you have ideas for something that's missing for your style.
Creating a New Session
To create a new session:
- Right-click on your campaign in the Campaign Directory (bottom section of the directory)
- Select "Create Session"
- Give your session a name and number
- You can also note the session's date
Each session must have a unique number within a campaign. Sessions are sorted by number in the campaign directory, and the most recent session date determines the "current session" when in Play mode. There is a setting that will instead sort it by date or name.
The name is required, but it could be "Session 4" or something. If you name your sessions after you're done, you can also just call the current one "TBD" until you give it a name.
The Lazy DM Method
The Lazy DM method focuses on preparing these key elements for each session:
1. Strong Start
A compelling opening scene that immediately draws players into the action. This could be:
- An exciting combat encounter
- A dramatic social situation
- A mysterious discovery
- A time-sensitive problem
To add a Strong Start:
In your session, click the "Strong Start" tab
Enter your strong start description
Click "Save"
2. Vignettes (i.e. Scenes)
Potential scenes that might occur during your session. Lazy DM calls them scenes, but we call them "vignettes" to avoid confusion with Foundry scenes.
To add a vignette:
In your session, click the "Vignettes" tab
Click "Add Vignette"
Fill in the free-form description. Hit enter to save.
You can edit vignettes by clicking the description or the edit button.
3. Lore (i.e. Secrets and Clues)
Information that players might discover during the session. This helps create a sense of discovery and progression. Lazy DM calls these "secrets and clues" but we call them "Lore" because a) it's simpler, and b) we have a mechanism to track Lore on the campaign - not just the session. And that means you might want to keeps things there that aren't exactly secrets or clues.
To add lore:
In your session, click the "Lore" tab
Click "Add Lore"
Fill in the lore details and hit enter to save. You can include links to Foundry documents (like Journal Entries) and Campaign Builder content in the text.
4. Locations
Key places that might be relevant to the upcoming session. They comes from Locations in your Setting.
To add a Location:
In your session, click the "Locations" tab
Click "Add Location"
Select a Location from your Setting
Alternately, drag/drop a location from the Setting Directory to the drop box to add it to the session.
You can click on the name or parent (if applicable) to open those locations in the tab.
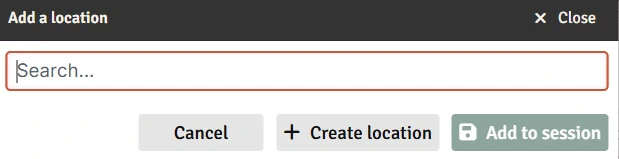
You can also create a new location right from the session screen by clicking "Create Location" in the add location box.
TIP
You can drag/drop anything from either the Setting Directory or the Campaign Directory onto a Foundry scene to create a map note that will open that piece of content directly in Campaign Builder. This can be particularly useful for things like putting Location descriptions on the map. Clicking the note then opens the Location entry, providing quick access to any other related content.
5. NPCs
Characters that might appear in the upcoming session. NPCs are Characters in your Setting.
To add an NPC:
In your session, click the "NPCs" tab
Click "Add NPC"
Select a Character from your Setting
Alternately, drag/drop a character from the Setting Directory to the drop box to add it to the session.
You can click on the name to open the character in the tab.
You can also create a new NPC right from the session screen by clicking "Create Character" in the add character box.

6. Monsters
Creatures that players might encounter during the session. Monsters are tied to Foundry actors.
To add a monster:
In your session, click the "Monsters" tab
Click "Add monster"
Select an actor (this list currently only includes actors in the world - not in compendia)
Alternately, drag/drop an actor from elsewhere in Foundry to the drop box to add it to the session.
You can click on the number cell or the edit button to change the number of monsters you're thinking about using. Press Enter to save, Escape to cancel.
You can use the drag grabber left of the name to drag the monster onto the current scene. Simply click on it, then drag to where you want the token to go. This works exactly like dragging an actor from the Foundry toolbar and makes it easy to add the monsters from your session prep to the Foundry scene.
7. Magic Items
Treasures that might appear during the session.
To add a magic item:
In your session, click the "Magic Items" tab
Drag an item from somewhere else in Foundry onto the list
You can then use the drag grabber to drag the item to an actor/character sheet to add it to that actor's inventory.
Session Wrap-up
After each session:
Review the to-do list for anything that needs attention. Delete things as you handle them or edit the descriptions to leave yourself notes for later.
Look through all session tabs for unused elements:
- Delete elements that are no longer relevant to your setting/campaign
- Many of the items above have notations in their tables that they can be 'moved to the next session' or 'delivered', or in the case of lore also 'moved to the campaign'. Here is what that means and why you might want to do it:
- Move to next session: Remove this item from the current session and add it to the list on the next one. Useful for easily carrying over things you didn't get to.
- Move to campaign: For Lore items in particular, you can move them back to the campaign lore list if you want to keep it for later.
- Delivered: Marking any item as delivered means it came up during the session. This is an easy way to track what's come up already as you work through the session. It also adds the item to the To-Do list as a reminder that it came up in case after the session you want to flesh out notes, or update the entry in Setting in case it comes up again in the future. Finally, marking NPCs and Locations as delivered will add a cross-reference to them on their Entry screen so you can quickly look back at when different things came up in the campaign.
TIP
For Lore items, marking them as delivered can also add the Lore to the master campaign list. Lore items that are marked as significant and also delivered will show up on the campaign's "Delivered Lore" list.